Sunday 27 March 2011

Venetian mask making tutorial Part 3.

This is the decoration part of the tutorial.  I'm going to show you how I achieved the look of my finished mask but you could of course do absolutely anything.

Step 11.  Sketch in lightly the lines of the design in pencil.  Fear not! If you go wrong you can always erase or repaint it white again.


Criss-cross design pencilled in.

Step 12.  Paint the mask in your desired acrylic colours working from palest to darkest.  Depending on the colour and quality of the paint you may need more than one coat.


Metallic white paint.  I splashed out on this colour but it's so pretty.


Next I painted the red parts.


Finally the black.  The black hides a multitude of sins so I painted the inside of the mask with it as well.  It helps to hide the uneven surface.

Step 13.  Glue gun the braid in place.


Glue braid all around the outside of the mask to finish off the design and cover the raw edges.
Step 14.  Glue gun ribbons to the underside of the mask and hey presto you are done!!


Finito :)

Saturday 26 March 2011

Spring is officially here....

I'm trying to practice my photography a little, it would be nice to be less clunky with the camera.  I thought I'd take a few shots of the flowers around before an impromptu frost kills everything.


Friday 25 March 2011

Venetian mask making tutorial! Part 2!

Here's what to do once you have your thoroughly dried and set plaster of paris mask.  The next steps are almost as messy so continuing on......

Step 6.  Dollop out some of your acryllic repair putty, a little goes a long way.  Using a sponge gently apply this to the mask in small sweeping motions, working it onto the surface.  The main idea is to fill in the gaps and build up a thin layer onto mask.  Some parts may need a bit more filling, for example the bridge of the nose and the slopes down towards the eye holes.  At this point it's not going to have a smooth surface.  Leave to dry, ideally overnight.


This is what the mask looks like after the putty has been applied and left to dry.  As you can see it's hard to get all the lumps, bumps and holes filled in with just one layer of putty so just give it a good overall coating and don't worry too much.

Step 7.  This bit requires elbow grease, a piece of course sand paper and quite a bit of patience.  Smoothing the surface takes time as you still need to be gentle, if you are too rough the mask will weaken.  I found that holding it firmly, directly underneath the part you are sanding, helps to support it and prevent damage.

Step 8.  You will get to a stage where many parts of the mask are wonderfully smooth  but others are riddled with holes, dimples and rough spots.  At this point it's time for some more acryllic putty however I would now advise applying it with a plaster knife or pallette.  Target just the holes and divots.  You can also use it to sculpt around any wonkey bits - smooth around the eye holes and outside edges. Leave to dry.


I have painted the mask white here, purely to show how I applied the putty in my attempts to achieve ultimate smoothness.

Step 9.  More sanding!  Use the course sand paper for smoothing off any harsh lumps and switch to fine sand paper to finish off the surface.  I found that the fine paper is really good for shaping the eye holes and edges. You can repeat the process of putty and sanding as many times as you need to get a smooth surface.


This photo was taken after three layers of putty and sanding.

Step 10.  When you are finally totally satisfied with the surface of the mask it's time to paint it white.  Acryllic is best and you want to aim for around three coats.  You can lightly sand after the third coat just to remove brush strokes if you like.

Part 3 coming soon.....

Tuesday 22 March 2011

Adventures in Venetian mask making; a tutorial - Part 1.

A couple of weeks ago whilst exploring the internet I came across some images of venetian masks and I thought wouldn't it be fun to make one?!  After a fair bit of research I'd found that there are several ways of going about this, the traditional way being paper mache, but I'm going with a plaster of paris base. 
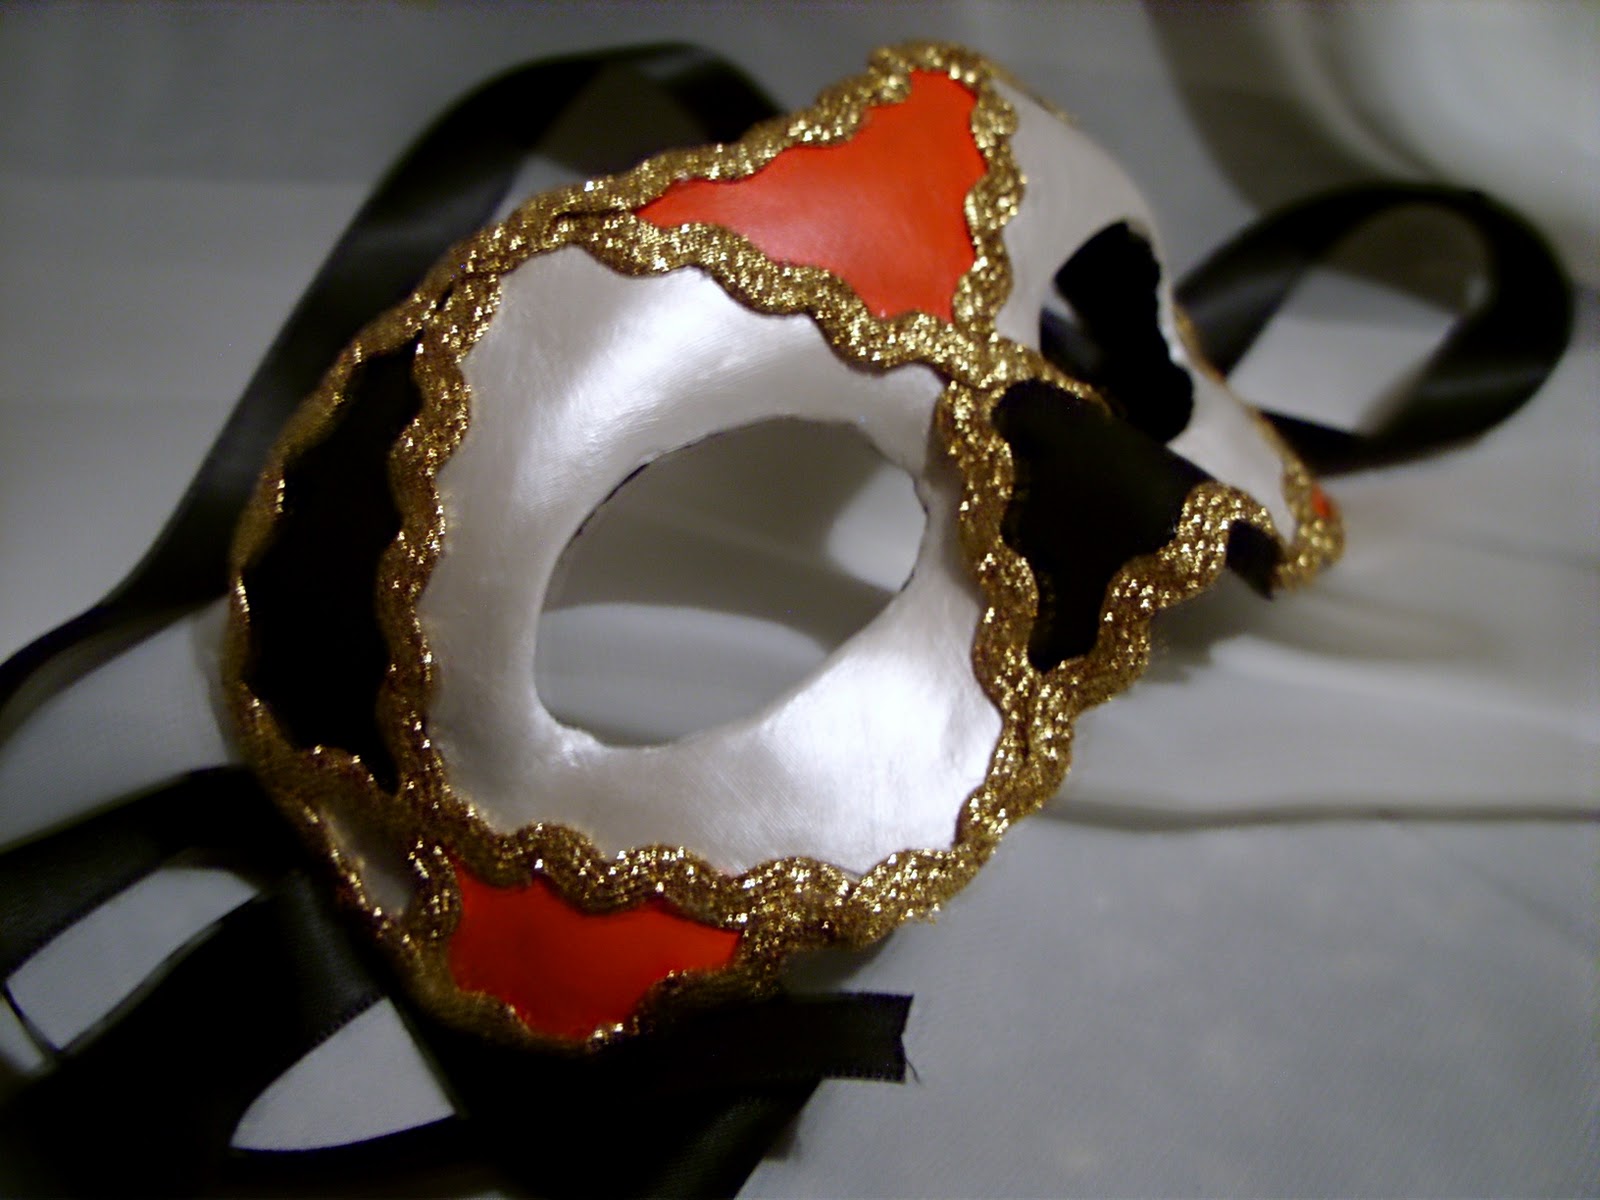


The finished mask.

First you need to design your mask or at least have some rough idea of what its going to look like.  The major decision is symmetrical or asymmetrical.  The problem with symmetry is that it's quite a lot of hard work to get it looking perfect however I have a couple of tricks for helping with this.

The materials you will need are:
  • Plaster of  paris bandage or "Modroc" as it's sometimes called.

  • Polyfilla or any type of acrylic repair putty.

  • Sandpaper (course and fine)
  • Sponge applicator, I chose to use an artists sponge brush but you could use any sort of sponge.

  • Vaseline
  • Acrylic paint - white plus whatever colours take your fancy
  • Plaster/putty knife

  • Paint brush
 The first thing you need to do is a bit of prep.  Being that I chose to make my mask symmetrical I cut out some cardboard shapes to act as a pattern.  The simplest way to do this is to cut out the complete shape of the mask and chop it in to the bits you need.  I ended up with one piece as a guide for the top, one for the side, one for the bottom, and two bits to guide eye hole shape.  If you are going with an asymmetrical shaped mask you can get away without this step except perhaps the eye hole guides which will help with eye shape in any case.


Step 1.  Cut out pieces of modroc/bandage.  Cut around your little pattern pieces on the bandage, you need enough for three layers on each side of the face.  Also chop up some strips and squares of various sizes.

Step 2.  Apply vaseline generously to you or your 'victims' face.  This is really important, especially over the eyebrows You must apply a layer to protect your skin or the plaster of paris will happily stick to it. Follow any other instructions on the packet of plaster bandage carefully. Lay down some newspaper and wear old clothes.

Step 3. Dip a piece of plaster bandage into a bowl of warm water to activate it and apply to the face.  I started at the top - across the forehead and worked down.  As you work think about how you are placing the strips, make sure they overlap and that everything is fusing together well.  You need about 3 layers for a sturdy mask.

Step 4.  Sit back and wait for the mask to dry.  This doesn't take very long, about 30 mins.  The mask tends to feel quite cold against the skin and you can gently wriggle your facial muscles to start loosening it from your face.

Step 5.  Remove the mask from your face, again, let your facial muscles do the work, pull lots of faces and it should come away.  I would advise leaving the mask overnight to ensure it can harden properly.


Pictures of the finished plaster of paris mask.  After you have allowed it to dry overnight you can gently inspect it for any faults or crumbly bits.  Any parts that are in danger of falling off can be reinforced with more plaster of paris bandage.  Carefully wet the area of the mask that needs repair and apply bandage.

Part 2 coming soon!

Sunday 20 March 2011

Finished Project - The Sirona Gown

This has been one of those projects where everything fell blissfully into place. There were no major difficulties to navigate, everything fit where it should and I didn't pull a single hair out!!!


The completed dress squeezed onto Claudia!


Dress from the front and a swooooosh of train.


With the lining all done and the hems all sorted, the best bit of all still remained - decoration.


I made loads of flowers (a biscuit tin full) from satin, organza and any other fabrics in shades of gold and cream I had in my stash.


I also payed a visted to Primark and bought a couple of pieces of jewellry which I cut up to utilise the beads.  This is a great way of buying beads on a budget.


 Pinning flowers in place.


More flowers arranged over the shoulder.


Flowers on the waistline.


Another shot of the front.

Space is a bit tight to get decent photographs of the entire dress so when the weather dries up a bit I'm planning to drag Claudia into the garden and get some better photos.

Tuesday 8 March 2011

Draping with chiffon - the Sirona Gown.

I don't do a lot of draping, I'm much more confident when it comes to flat pattern cutting but for this dress it was simply the best option so I plunged into unknown territory.  I  bought eight metres of cream chiffon for this dress and in the end I used about seven.


 I started with the front and back of the dress pinned onto Claudia and worked from right to left gradually pleating and pinning the width of the chiffon in place along the neckline. Working like this there was enough chiffon to take me just past the centre front so I used the other end of the 8 metres to continue.


Taking the other end of chiffon I draped down the strap and back towards the centre front where they overlap.


Chiffon puddles!

At this point I had a good look at how it was going overall and felt safe enough to start cutting the hem.  Once I had chopped the fabric at the hem I started pinning the chiffon in the same manner onto the back, working from right to left - towards the strap.  When I ran out of width I used the other end of the length of chiffon once again to work down the strap towards the centre back.


The back!


The train taking shape.

From here I had the arduous task of removing the two parts of the dress from Claudia and inserting the concealed zip oh-so carefully into the side seam whilst trying to keep everything in place.  Once that was done I sewed up the other side seam and finished the draping of the underarm panels.


This is the final shot I took of the chiffon pinned in place before I hand sewed all the little tucks, gathers, and pleats down.


Friday 4 March 2011

Panniers - finished

I finally got around to the finishing touches on these and now they are done.  Functionally speaking they are great - sturdy and supportive but aesthetically they are a bit of an ugly duckling.  I think they could be a lot prettier if I made them out of some nicer fabric and maybe even trimmed it with ruffles.

Panniers from the front.

Panniers from the back.

The hem is finished with bias binding and the waistband fastens with a hook and eye on the inside and ribbons for extra security on the outside.

Here you can see the inside tapes used for controlling the springyness of the panniers.  There a two sets positioned either side to sit against the body whilst they are worn thus creating tension against the wearers legs.  There is also another set in each of the domes to keep them stable.


Tuesday 1 March 2011

My Favourite Oscar Dresses

I was really looking forward to seeing what was worn by hollywoods finest on the red carpet but it wasn't as spectacular as I might have hoped.  I think a lot of stars played it safe this year and did what was expected rather than pushing boundaries which is a shame.  Pale and nude colours were a big favourite, to the point were it bordered on bland.  Anyone who chose to wear bright colour really stood out and looked all the better for it.  Having said that my best dressed of the night was pale toned.....


Personally I love this Givenchy dress on Cate Blanchett although it seems to have made as many worst dressed lists as best. I think it was a brave choice, something a little bit different and an interesting, original design.


My second favourite couldn't be more different.  Camilla Alves in this black Kaufman Franco gown looked stunning.  It's such a pretty and flattering design - I adore the way the skirts fall from the waistband.  I might have to have a go at making this!


Sandra Bullock in a red Vera Wang creation.  the construction and cut of this dress won me over instantly.  It's immaculate.


A pregnant Natalie Portman looking downright gorgeous.  Dressing to accommodate her bump must have been no small feat, of course, having a gown made by Rodart (the ladies who designed the costumes for Black Swan) helps.