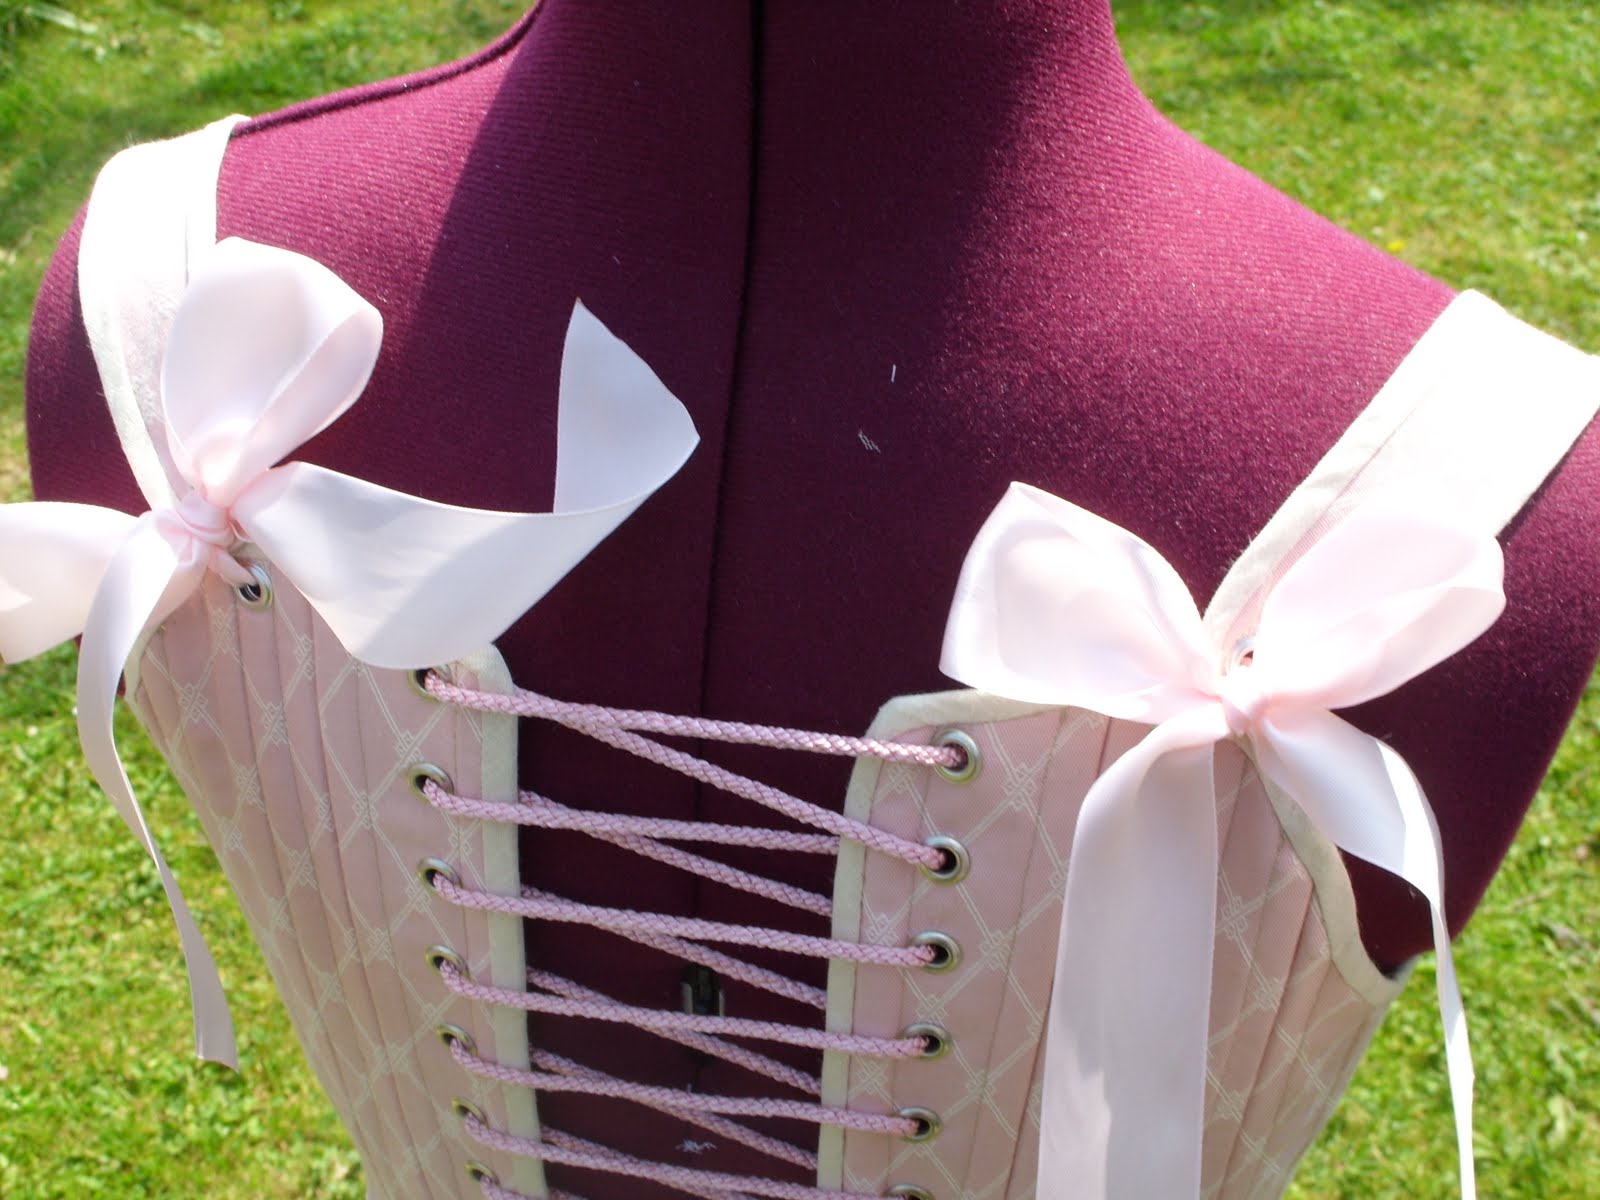
So I finally finished these stays. I never did manage to find just the right shade of blue/grey fabric for the bias binding and in the end I just gave in and went with a pale blue, otherwise they may never have been finished.
It doesn't matter how bendy your joints are, or even if you're a direct descendant of Houdini, getting in and out of back lacing stays is just too difficult without help. So, I really wanted a front lacing pair of stays to be able to put them on myself without needing an assistant.
I also made the straps front and back lacing for extra prettiness.
I love stay-making, it's so theraputic and satisfying to see them come together, so much to entertain the eye.
Showing posts with label 18th Century. Show all posts
Saturday, 31 December 2011
Wednesday, 18 May 2011
Eye Candy -18th Century Inspired Paper Wigs
I came across these astonishing works of paper manipulation whilst poking about on the internet. I think they are absolutely beautiful and highly recommend the website of the artists that created them.
http://www.paper-cut-project.com
![]() | |||||||||||
| Image from www.paper-cut-project.com |
![]() |
| Image from www.paper-cut-project.com |
Labels:
18th Century,
Eye Candy,
Marie Antoinette,
paper craft,
Wig
Monday, 9 May 2011
New project - Gold and blue stays!
I got about half way through my pink stays and decided that I wanted to make another pair that were front lacing and richer in colour. I chose a gold patterned fabric from my stash for the outer and a pale blue linen for the lining.
I have utilised the same 'Corsets and Crinolines' pattern from my pink stays but I have cut up the centre front. The front will have eyelets which meant I needed to rearrange the placement and direction of the bones slightly.
This is the lining of one the front panels. In order to maintain the effectiveness of the shaping around the bust, after slicing up the centre front, I put in this extra layer of bones with gaps for the eyelets.
The finished back panels.
A close up of the fabric.
I have been hunting high and low for just the right shade of blue for the bias binding to finish it off but as yet I havn't found what I'm looking for. The quest continues.............
I have utilised the same 'Corsets and Crinolines' pattern from my pink stays but I have cut up the centre front. The front will have eyelets which meant I needed to rearrange the placement and direction of the bones slightly.
This is the lining of one the front panels. In order to maintain the effectiveness of the shaping around the bust, after slicing up the centre front, I put in this extra layer of bones with gaps for the eyelets.
The finished back panels.
A close up of the fabric.
I have been hunting high and low for just the right shade of blue for the bias binding to finish it off but as yet I havn't found what I'm looking for. The quest continues.............
Labels:
1780,
18th Century,
blue,
corsetry,
corsets and crinolines,
gold,
norah waugh,
stays
Wednesday, 4 May 2011
Finished project - pink 18th Century stays.
The stays are all done and poor old Claudia was promptly dragged out into the garden and crammed into them. Actually, I didn't think she'd fit at all because she is so 'un-squishy' but they laced up really well around her.
All of the boning channels and seams are sewn by machine, the bias binding to finish off all the raw edges was done by hand.
The stays from the back - I used metal eyelets.
The straps tie together at the back with ribbons throught the eyelets.
These were so fun to make, so much fun in fact that I'm already embarking on another set of stays. This time I'm going for a richer colour palette with front and back lacing.
All of the boning channels and seams are sewn by machine, the bias binding to finish off all the raw edges was done by hand.
The stays from the back - I used metal eyelets.
The straps tie together at the back with ribbons throught the eyelets.
These were so fun to make, so much fun in fact that I'm already embarking on another set of stays. This time I'm going for a richer colour palette with front and back lacing.
Labels:
1780,
18th Century,
corsetry,
Finished project,
pink,
stays
Friday, 22 April 2011
18th Century stays - in progress.
I have started a new project - a set of half boned stays. I was so engrossed in the sewing of them that I forgot to take photos until I had finished most of the boning. I used the 1780 pattern from 'Corsets and Crinolines' by Norah Waugh which is a bit of a headache to scale up as it's not on a grid on the page. Once I had my paper pattern I cut out a calico toile just to check the fit.
This is one half of the stays in my yummy pastel pink fabric. I confess - its curtain fabric and the lining is a dusky pink chintz. Furnishing fabric shops are my new obsession. I guess it's because the patterns and colours are better suited to historical fashion, plus they are nice and strong - ideal for stays. I am using cable ties for the bones - a fabulous tip I picked up from American Duchess. Rather irritatingly, I bought a bunch of 36 thinking it would be plenty and I was 3 short....grrrrrrrr!!!
All the panels are sewn together.
The inside of the stays. From here I need to find or make some delicious bias binding to finish all the edges and whack in some eyelets.
This is one half of the stays in my yummy pastel pink fabric. I confess - its curtain fabric and the lining is a dusky pink chintz. Furnishing fabric shops are my new obsession. I guess it's because the patterns and colours are better suited to historical fashion, plus they are nice and strong - ideal for stays. I am using cable ties for the bones - a fabulous tip I picked up from American Duchess. Rather irritatingly, I bought a bunch of 36 thinking it would be plenty and I was 3 short....grrrrrrrr!!!
All the panels are sewn together.
The inside of the stays. From here I need to find or make some delicious bias binding to finish all the edges and whack in some eyelets.
Friday, 4 March 2011
Panniers - finished
I finally got around to the finishing touches on these and now they are done. Functionally speaking they are great - sturdy and supportive but aesthetically they are a bit of an ugly duckling. I think they could be a lot prettier if I made them out of some nicer fabric and maybe even trimmed it with ruffles.
Panniers from the front.
Panniers from the back.
The hem is finished with bias binding and the waistband fastens with a hook and eye on the inside and ribbons for extra security on the outside.
Here you can see the inside tapes used for controlling the springyness of the panniers. There a two sets positioned either side to sit against the body whilst they are worn thus creating tension against the wearers legs. There is also another set in each of the domes to keep them stable.
Labels:
18th Century,
finished,
Panniers,
underpinnings
Saturday, 15 January 2011
Moderately sized panniers in progress.........
I came to realise that the panniers I made previously were ultimately just too big to work with and require gargantuan amounts of fabric - although I do still love them and hope to do something with them in the future. These panniers are based on the idea of pocket hoops but with fabric connecting them across the front and back for extra stability. I'm not too keen on the instability of pocket hoops that just sit on the hips with nothing to control them.
Each hip has three horizontal channels of boning plus one vertical channel which goes almost right up to the waist edge creating an arch strong enough to support a gown. My boning of choice is a plastic called 'Triple-flex', it's so lightweight which is perfect for crinolines and bustles etc, although not if you're looking to be historically accurate.

All that remains is to tidy up the insides, apply a waistband and finish the hem!
Each hip has three horizontal channels of boning plus one vertical channel which goes almost right up to the waist edge creating an arch strong enough to support a gown. My boning of choice is a plastic called 'Triple-flex', it's so lightweight which is perfect for crinolines and bustles etc, although not if you're looking to be historically accurate.
All that remains is to tidy up the insides, apply a waistband and finish the hem!
Thursday, 25 November 2010
18th Century petticoat update and the beginning of a new dress
I started this petticoat a while ago but then things got too busy to do any further work on it. I've finally dug the poor thing out of the bag it was languishing in and given it some much needed attention. This is what the petticoat looks like so far - unfortunately it's rather large and difficult to get a photo of it all in one shot.

This is the back - you can see where it fastens at the waist with ribbons.

The front view - which is should hopefully hang smoothly when I'm finished with it. The outward length over the panniers is adustable by pull cords so it could in theory fit over a set of smaller panniers. All that remains is to sew in the pleated side panels and finish the hem.
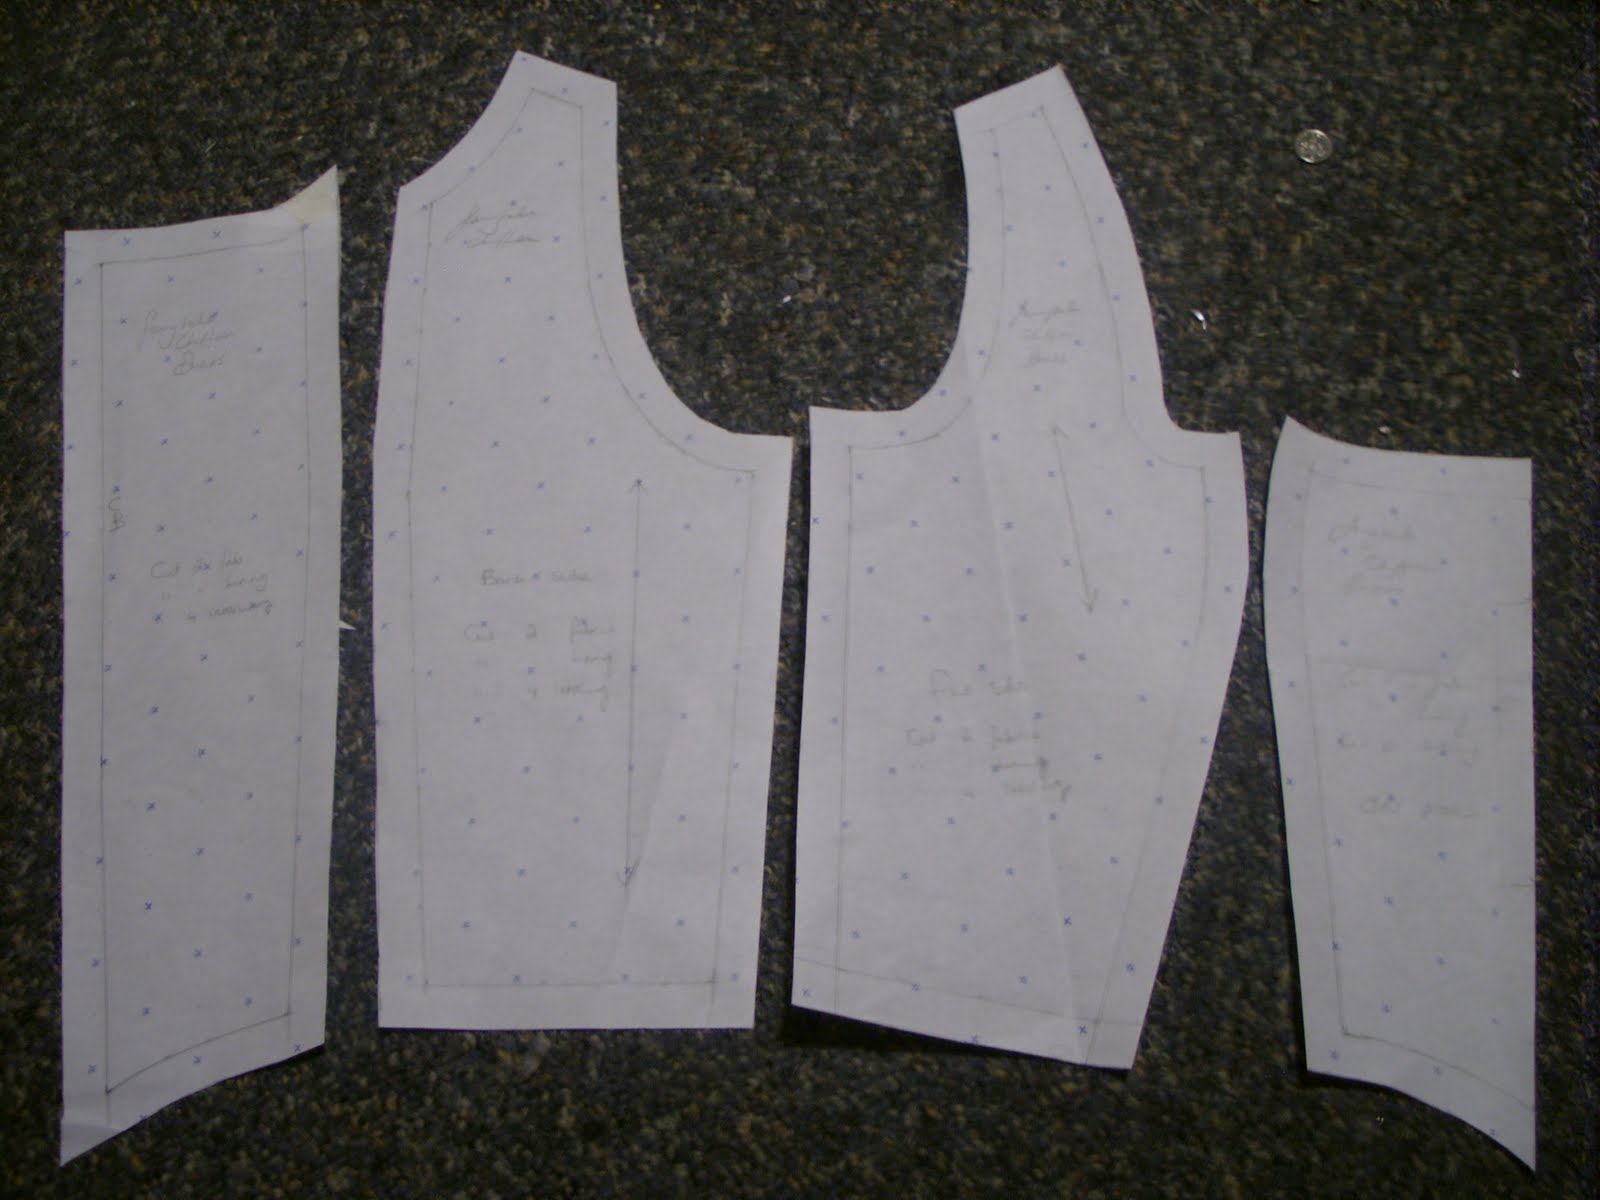
I have also started cutting a pattern for a new dress, which I have for now nicknamed the "fairytale chiffon dress". This is the final draft of the bodice - it's princess seamed and will be constructed from several layers.
This is the back - you can see where it fastens at the waist with ribbons.
The front view - which is should hopefully hang smoothly when I'm finished with it. The outward length over the panniers is adustable by pull cords so it could in theory fit over a set of smaller panniers. All that remains is to sew in the pleated side panels and finish the hem.
I have also started cutting a pattern for a new dress, which I have for now nicknamed the "fairytale chiffon dress". This is the final draft of the bodice - it's princess seamed and will be constructed from several layers.
Labels:
18th Century,
bodice,
chiffon,
dress,
fairytale,
Panniers,
pattern cutting,
petticoat
Monday, 9 August 2010
18th Century petticoat - progress
My petticoat to fit over my finished panniers is coming along nicely albeit slowly. I'm sewing it all by hand in methods as true to the 18th Century as my knowledge allows. This first picture shows off the colour of the fabric best. It's a soft gold and has a not so 18th century pattern on the front so i'm using the wrong side which is plain and has a nice shimmer.
I'm finishing all my inside raw edges with bias tape which is hard work but I love the way it looks and I think it's worth the effort.
To finish the raw waist edges which are visible on the outside of the petticoat I am using bias tape that I have cut from the fabric to give a cleaner look.
I still have a fair few more edges to finish by hand before I move on to sewing channels for the drawstrings.
Thursday, 29 July 2010
18th Century petticoat
Now that the panniers are done I'm starting to think about the petticoat to go over it and how it might be trimmed and decorated. After much trawling through images and weighing up options this scrumptious robe a'la francaise is my favourite.

I think the proportions of this gown are lovely. I love how striking the box pleated trim is on the gown itself, I wonder if each one is padded slightly to give them a little more oomph!
The flounce that decorates the front of a petticoat is called a furbelow and for reasons of expense only covers the part of the petticoat that is visible. Women would often wear the same dress to different occasions but change the trims to create a slightly different look.

I think the proportions of this gown are lovely. I love how striking the box pleated trim is on the gown itself, I wonder if each one is padded slightly to give them a little more oomph!
The flounce that decorates the front of a petticoat is called a furbelow and for reasons of expense only covers the part of the petticoat that is visible. Women would often wear the same dress to different occasions but change the trims to create a slightly different look.
Labels:
18th Century,
furbelow,
Panniers,
petticoat,
robe a'la francaise
Monday, 26 July 2010
My panniers are finished!!
Yippee! They are finally done. Goodness knows where I'm going to store them, they span well over a metre at hip level. I dragged Claudia outside to get better photos and the wind kept catching her and rotating her like a windmill!
There are supposed to be tapes attached to the inside and tied off to enable the adjustment and control of the 'springyness'. I have played around, pinning tapes to the insides to see how this might work but I have decided to wait and see how the panniers behave with a petticoat over them before I sew any tapes in.
Its boned with continuous spring steel, the boning channels are simply sewn down bias tape. I have made it collapsable, the vertical steel boning is held in by tied off ribbons at each of the four corners but this can be undone and the boning removed. That said, it's still pretty bulky when collapsed. The waist is draw-string and ties on either side for easier adjustment.
Tuesday, 6 July 2010
Panniers 1755
I have started to make a set of panniers. I cut my pattern for this with guidance from 'The Evolution of Fashion' by Margot Hamilton Hill and Peter Bucknell. They are quite hard to take a photo of because they are so huge, this is just the front! The curved dip at the top in the middle will be gathered to the waist with ties. It's hemmed and all the raw edges are finished. I am currently at the stage of sewing the tapes in place which will form the channels for the boning.
Labels:
1755,
18th Century,
hooped,
Panniers,
underpinnings,
underskirt
Subscribe to:
Posts (Atom)